Using a router isn’t as daunting as it sounds. Picture it as having a little wood sculptor in your workshop, ready to carve out the precise space you need. If you’re using a compact router or a traditional plunge router, you’ve got what it takes to get the job done. Let’s dive into using this versatile tool, step by step, so you can have confidence in deepening your hinge mortise.
Understanding the Basics of Router Use
Before we get started, it’s essential to understand what a router does. Essentially, a router is a power tool that hollow out areas in wood. By using different bits, you can create grooves, patterns, or even large mortises for hinges. Narrowing down to hinge mortises, these holes allow hinges to sit flush with the door or frame, which is critical for proper operation.
You might be wondering why you should opt for a router over other methods, like chiseling. While chiseling can work, it’s often less precise, and you run the risk of making mistakes. Routers give you a clean, professional finish with less effort. In the end, you’ll save time and avoid frustration.
Gathering Your Tools and Materials
To begin, you’ll need a few essential items. Let’s break it down:
- Router: A compact or plunge router works best.
- Router bit: A straight bit is ideal for deepening mortises.
- Hinge template or jig: This helps keep your cuts straight and accurate.
- Clamps: To secure your workpiece and prevent movement.
- Measuring tape and pencil: For marking your cut lines.
- Safety gear: Include eye protection and a dust mask.
Having everything ready saves you from unnecessary interruptions. Once you gather your tools, you can approach the task with a bit more urgency.
Preparing Your Workpiece for Routing
Now that you’ve got your tools ready, it’s time to prep your workpiece. Start by measuring where the hinge mortise needs to go. Mark your measurements carefully with a pencil. Precision here is vital. If you’re off by even a hair, it can lead to misalignment when you install your door.
Once you’ve marked your mortise, clamp your door or frame securely. This step is crucial; if the piece shifts while you’re routing, you could end up with an uneven mortise. Think of it like holding a piece of paper while you’re trying to write. You want it steady so you can focus on the task at hand.
Setting Up the Router
Next, set up your router. First, install the straight bit that’s appropriate for the depth you need. If you’re using a plunge router, you’ll want to adjust the base to determine how deep you’ll cut. A good rule of thumb is to start shallow and gradually increase the depth until you reach your desired mortise depth.
Before you plunge into the actual workpiece, practice on a scrap piece of wood. This allows you to get a feel for how the router handles and ensures your settings are right. After all, who wants to make mistakes on a beautiful new door?
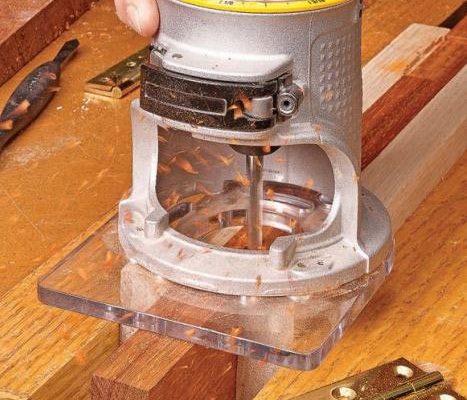
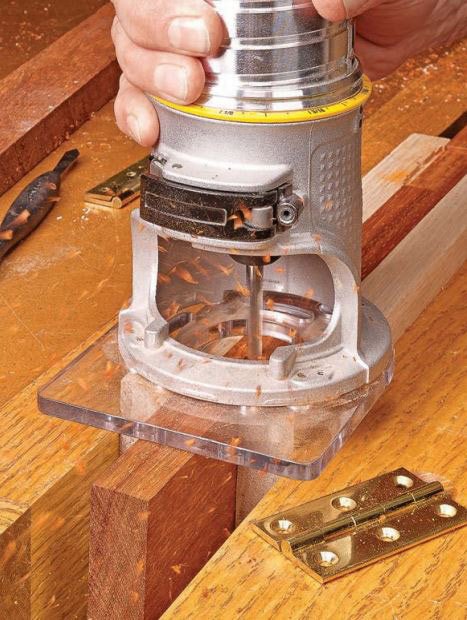
Routing the Hinge Mortise
With everything set, it’s showtime! Switch on the router and, using a steady hand, guide it along the marked lines for your mortise. Start slowly; allowing the tool to do the work is critical. You don’t need to rush this part.
If you’re using a router template or jig, follow its guidelines closely. This helps maintain a straight cut. Remember, you can always make the mortise deeper, but filling it in isn’t as easy. Do a few passes rather than trying to cut it all at once, as this reduces the chance of burning the wood or causing splintering.
Finishing Touches: Cleaning Up the Mortise
Once you’ve reached your desired depth, it’s time for some finishing touches. Carefully remove any rough edges left from the router. You can use a chisel or sandpaper to smooth out the area. This step ensures that your hinge will fit snugly and sit flush against the door or frame.
Inspect the mortise. Is it clear of debris? Do the sides feel smooth? If everything looks good, you’re ready to move on to installing the hinges! If you notice any imperfections, it’s worth it to go back and clean them up.
Installing the Hinges
Now that your mortise is ready, it’s time to install the hinges. Position the hinge over the mortise and mark where the screws will go. Pre-drilling holes can help prevent the wood from splitting when you screw the hinges in. Secure the hinges tightly but be careful not to overtighten, as this can strip the screws.
Once the hinges are in place, gently close the door to check the alignment. Does it swing smoothly? If not, you might need to make minor adjustments to the mortise or hinge placement. It’s all about fine-tuning until everything feels just right.
Common Issues and Troubleshooting
Even with the best intentions, you might run into a few hiccups along the way. Here are some common issues and how to troubleshoot them:
1. Router Not Cutting Deep Enough: If you’re not getting the depth you need, double-check the bit’s height and settings. Adjust as needed.
2. Rough Edges: If the mortise has fuzzy edges, you may need a sharper bit or to move the router more slowly.
3. Misalignment: If the hinge doesn’t sit flush, it could be that your measurements were slightly off. It’s often easier to deepen the mortise slightly to fix this.
Using a router to deepen a hinge mortise is a skill that can significantly improve your woodworking projects. With practice, you’ll find it’s an efficient way to achieve precise cuts that lend a professional touch to your doors. The key is preparation, patience, and a steady hand.
So grab your router and give it a go! You might just find yourself falling in love with woodworking. With each cut, you’re one step closer to mastering your craft, and who knows? You might even inspire a friend to join you on this journey. Happy routing!