Honestly, installing one sounds trickier than it is. Most people imagine crawling around with sticky caulk or fancy carpentry skills. In reality, most modern threshold seal kits—like the reliable Frost King aluminum models or universal rubber strips—are designed for total beginners. If you can measure, cut, and screw stuff in, you’re about halfway there. Let me walk you through the basics, share the best tips, and help you avoid the most common mistakes.
What Is a Door Threshold Seal and Why Do You Need One?
A door threshold seal is a simple, often overlooked strip that sits at the base of your door, bridging the gap between your door and the floor. Its main job? Block water, drafts, dust, and even critters from sneaking inside. You might be wondering if it’s really necessary—after all, shouldn’t a closed door do the trick? Here’s the thing: most exterior doors have a small gap at the bottom to allow for smooth movement and prevent scraping. Unfortunately, that gap is like a welcome mat for water when the weather gets wild.
If your entryway gets wet during heavy rain, or you feel cold drafts in winter, a missing or worn-out threshold seal is usually the culprit. Over time, old seals can crack, shrink, or lose their flexibility—letting water slip right through. Newer seals, especially rubber or silicone types, hug the floor much more tightly. Whether you live in a rainy climate or just want to keep your home more energy efficient, installing a threshold seal is a small upgrade that makes a big difference.
Choosing the Right Door Threshold Seal
Picking the right threshold seal can feel overwhelming, especially when you see dozens of choices at the home improvement store. The goal is to match the seal to your door style, floor type, and the amount of water you want to block. There are three main types: aluminum thresholds with rubber inserts, flexible vinyl strips, and heavy-duty silicone seals.
- Aluminum thresholds with rubber gaskets are sturdy, last a long time, and look sharp. They’re perfect for exterior doors where durability matters. Frost King and M-D Building Products offer popular models that fit most standard doors.
- Flexible vinyl or silicone strips are easy to cut and install. They’re softer, so they seal uneven floors really well. Universal options are available if you’re retrofitting an older door.
- Full-length sweeps attach to the bottom edge of the door itself and work great when paired with a threshold. These are especially handy for extreme weather or uneven floors.
Measure your door width and check the gap at the bottom before shopping. If your door opens outward, make sure the seal won’t block movement. And if the area gets tons of water, a combination of a raised threshold and seal provides the best protection.
Gathering Tools and Materials
Before you dive in, gathering everything you need will save a ton of frustration. Most people can install a threshold seal with basic hand tools—no fancy gadgets required. Here’s what you’ll typically need:
- Measuring tape and pencil for marking your cuts and screw holes.
- Hacksaw or sharp utility knife, depending on your seal’s material. Aluminum seals need a hacksaw; rubber or vinyl strips can be trimmed with a knife.
- Screwdriver or drill for fastening the seal to your floor or door.
- Weatherproof screws (usually come with the kit).
- Caulk or adhesive if recommended for extra sealing—especially on concrete or rough floors.
If your existing threshold is warped or rotten, you’ll also want a pry bar and possibly a replacement threshold. Double-check the instructions that come with your seal, as some brands require slightly different setups.
Step-by-Step: How To Install a Door Threshold Seal
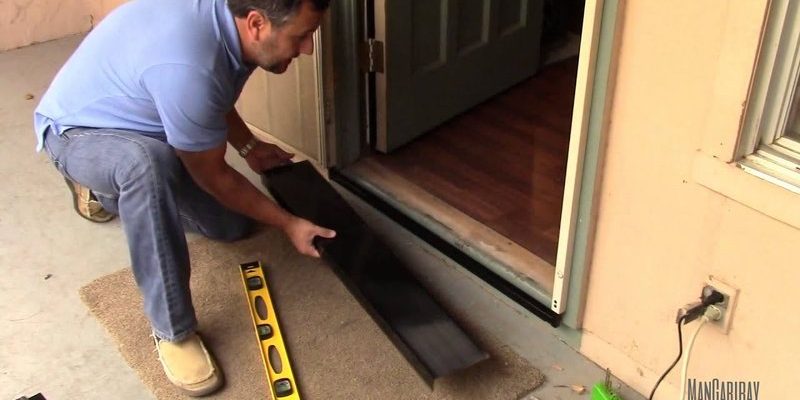
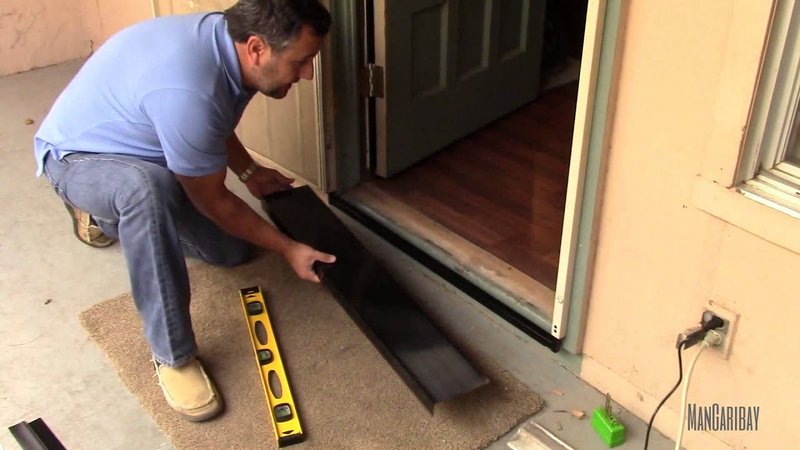
Okay, here’s where the rubber meets the road—literally. Installing a door threshold seal doesn’t have to be intimidating. I’ll walk you through a basic process, but always adjust based on your specific seal and brand.
- Remove the old seal (if there is one). Use a screwdriver or pry bar to take off worn strips or thresholds. Clean up dirt, glue, and debris so the new one will sit flat.
- Measure and cut the new seal. Measure the width of your door opening, then mark and cut the new threshold or strip to size. Leave about 1/16 inch on either side for a snug fit, but not so tight that it buckles.
- Test-fit the seal. Place the new seal in position. Open and close the door to check clearance. You want the door to sweep smoothly over it—no sticking or scraping.
- Attach the seal. For aluminum or raised thresholds, line up the pre-drilled holes and screw them into the floor. For flexible strips, peel off adhesive backing or apply caulk, then press firmly along the floor or door bottom.
- Seal the edges. Use exterior-grade caulk to seal any visible gaps along the sides or base, especially if you’re worried about heavy water intrusion. Smooth it out with a wet finger for a tidy finish.
If your door is tricky—maybe it’s old, warped, or sits over uneven tile—don’t stress. Most universal seals are designed to conform to wavy floors, and caulk can fill in the rest.
Testing and Adjusting For a Perfect Seal
Once your threshold seal is installed, you’re not quite finished. The last piece of the puzzle is making sure it actually keeps water out—and that your door still opens and closes without effort. Here’s how to check:
- Close the door and look for light seeping in under the edge. If you see bright spots, your seal may need to be adjusted or pressed down more firmly.
- Gently push water (or pour a small cup) against your door from the outside. Watch for leaks or drips inside. If water still sneaks through, recheck for gaps along the sides.
- Test functionality by swinging the door open and shut several times. There should be a slight “drag” but no force required. If the seal’s too tight, trim it a hair or lower the threshold with thicker screws or shims.
Give it a day or two to “settle”—sometimes new seals soften and shape themselves to your floor with use. If you notice drafts or leaks after a storm, go back and reseal edges with caulk.
Common Problems and Quick Fixes
Even the best door threshold seal can have hiccups, especially in older homes or with wonky door frames. You might be wondering what to do if yours doesn’t seem to work perfectly right away.
- Seal won’t stick: Clean the surface thoroughly, remove old adhesive, and try a fresh bead of caulk or stronger double-sided tape. Dust or oil can sabotage the bond.
- Gap too big for a standard seal: Stack a sweep and a raised threshold, or look for extra-thick universal seals. Some brands sell custom-cut options for oversized gaps.
- Door scrapes the new threshold: Double-check that your seal isn’t too tall. If it is, trim a bit off the bottom or sand down the raised ridge. For extreme cases, you might need to plane the bottom of your door a hair.
- Persistent leaks: Double up on the caulk—especially at the corners. If the threshold itself is warped or rotting, replacing it before sealing is the best fix.
Honestly, most problems come down to prep work—not cleaning the surface, rushing through alignment, or skipping the final “leak test.” It pays to go slow and check each step.
Alternatives and Extra Tips for Water Protection
Here’s the truth: while a door threshold seal goes a long way, sometimes you need more firepower against water. If your entryway is regularly flooded, consider additional steps for ultimate protection.
- Add a door sweep to the bottom of the door itself, especially if your threshold seal leaves any wiggle room. Sweeps with flexible fins are great for uneven tile or brick.
- Install a rain diverter above your door. This small metal flash catches dripping water and redirects it away from the threshold.
- Check your exterior grading. If water pools at your door after a storm, your lawn or porch may be angled the wrong way. Redirecting runoff with gutters or a small trench can make a huge difference.
- Use weatherproof paint or sealant along the bottom of your door to prevent wood rot and swelling, especially on older or wooden doors.
In some climates, pairing a tough aluminum threshold with both a sweep and silicone seal is standard. It’s a bit more work, but it’ll keep you dry even in the wildest downpour.
When To Replace a Door Threshold Seal
Threshold seals don’t last forever. Over time, exposure to sun, rain, and foot traffic wears them out—often before you notice. Here are some signs you might need a new one:
- Visible cracks or brittleness in rubber or vinyl seals
- Water, drafts, or bugs getting through, even after you’ve caulked or cleaned
- Split or warped aluminum (this usually means the whole threshold needs swapping)
- Persistent mildew smell or mold growth near the doorway—that’s a red flag water’s getting in
Most seals last between three and seven years, depending on exposure. If you’re unsure, it’s better to replace early than deal with bigger headaches like damaged flooring or mushroom invasions.
Wrapping It Up: Keeping Your Home Dry and Comfortable
In the end, installing a door threshold seal to prevent water intrusion is one of those DIY jobs that punch way above their weight. For the price of a movie ticket and an hour of your weekend, you can keep rain, drafts, and unwanted guests out of your house. Modern threshold seal kits—whether from Frost King or a universal brand—are designed with beginners in mind, making installation easier than ever.
So, if you’ve been tiptoeing around puddles or finding those mysterious drafts, don’t wait. Taking a few simple steps now will save you time, money, and hassle for years down the line. And trust me, there’s something deeply satisfying about watching water run right up to your door—then realizing it’s got nowhere to go but back outside.