When it comes to interior doors, the latch spring is a crucial little component we often overlook. It lives inside the door’s latch mechanism, helping the latch move in and out smoothly. If you’re struggling with a stubborn latch, don’t worry. Repairing a worn latch spring is a manageable DIY project, even for beginners. By the end of this article, you’ll feel confident tackling this repair and restoring functionality to your door.
Understanding the Latch Mechanism
To start, let’s discuss how the latch mechanism works. Picture a simple lock: when you push the door handle, it moves the latch into the door frame and then back out when you pull the handle. The latch spring is what allows this movement to happen smoothly. If the spring is stretched or damaged, the latch can get stuck, leading to those annoying moments when your door refuses to close.
Most interior doors have a standard latch mechanism that includes a latch bolt, a strike plate, and a latch spring. The latch bolt extends into the door frame when closed, keeping the door secure. The spring is what pushes the bolt back into the casing when you pull the handle. If the spring weakens, it doesn’t push the bolt out properly, which can lead to an array of issues.
Here’s the thing: understanding how this mechanism works can help you troubleshoot your door’s problems more effectively. By knowing what each part does, you can pinpoint where the issue might be and whether you need to replace the latch spring or if another part is at fault.
Identifying the Problem
Now that you’re familiar with the latch mechanism, let’s get to the heart of the matter: how do you know if the latch spring is the issue? Look out for these common signs:
- Door Won’t Latch: If your door doesn’t stay shut, the latch spring might not be pushing the bolt in properly.
- Stiff Handle: A handle that’s hard to turn could indicate a problem with the spring or the latch itself.
- Noise When Closing: If you hear a grinding or clicking noise, there may be debris caught in the latch or a problem with the spring.
If you’re experiencing any of these issues, it’s time to investigate further. A simple inspection can often reveal whether the latch spring needs repair or replacement. Start by removing the door handle and examining the latch assembly. If the spring looks out of shape, you’re likely on the right track.
Gather Your Tools
Before diving into the repair, you’ll want to gather the right tools. Here’s a short list of items you might need:
- Flathead and Phillips screwdrivers
- Replacement latch spring (if necessary)
- Lubricant (like WD-40)
- Small flashlight
- Soft cloth or towel
Having everything in one place will make the repair smoother. Trust me, there’s nothing more frustrating than scrambling for a tool halfway through a project. A little preparation can save you a lot of time and hassle.
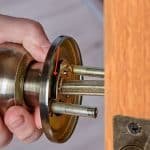
Removing the Door Handle
Now it’s time to get hands-on. The first thing you need to do is remove the door handle. Here’s how:
1. Use the appropriate screwdriver to unscrew the handle from both sides of the door.
2. Carefully pull the handle away from the door. You may need to wiggle it a bit to loosen it up.
3. Set the handle and screws aside in a safe place—you’ll need them later.
Taking off the handle exposes the latch assembly, allowing you to inspect the spring. With the door handle removed, the latch mechanism should be easily accessible for your repair.
Inspecting the Latch Spring
With everything opened up, take a closer look at the latch spring. Here’s what to do next:
– Visual Inspection: Look for any visible signs of wear, such as rust, bending, or breakage. If the spring is damaged, it’s best to replace it entirely.
– Testing: Gently pull on the latch bolt. If it feels stiff or won’t retract smoothly, it’s likely due to a malfunctioning spring.
– Cleaning: Sometimes, dirt and debris can interfere with the latch’s operation. Use a soft cloth to wipe down the latch assembly, making sure to remove any grime that may have built up.
Getting a clear picture of the spring’s condition will help you decide if you need to repair or replace it. If the spring is just dirty, a good clean may resolve the problem.
Replacing the Latch Spring
If you’ve determined that the spring needs replacing, don’t worry—it’s pretty straightforward. Here’s how to do it:
1. Remove the Old Spring: Carefully disengage the worn latch spring from its housing.
2. Install the New Spring: Insert the new latch spring into the mechanism, ensuring it is seated correctly.
3. Reassemble the Latch: Put everything back in place and make sure the latch moves smoothly.
It’s a bit like changing a tire—you want to make sure everything is tight and secure before you move on. If the new spring feels solid and the latch operates smoothly, you’ve successfully replaced the worn part!
Reassembling and Testing the Door
With the new spring in place, it’s time to put everything back together. Follow these steps:
1. Reattach the Door Handle: Line up the handle with the latch assembly and secure it with the screws you removed earlier.
2. Test the Door: Now comes the moment of truth. Close the door gently and test the handle to ensure everything is working properly.
3. Adjust if Necessary: If the door still isn’t latching properly, you might need to adjust the strike plate or ensure the latch is aligned correctly.
Testing is essential. You want to be sure that your door is fully functional before calling it a day. If everything goes smoothly, congratulations—you’ve just repaired a worn latch spring!
Preventative Maintenance for Your Door
To keep your doors functioning well in the long run, consider these maintenance tips:
- Regular Lubrication: A little spray of lubricant on the latch assembly every few months can help keep things running smoothly.
- Routine Checks: Make it a habit to inspect your doors periodically for any signs of wear and tear.
- Keep It Clean: Dirt can cause parts to wear faster, so cleaning the latch area regularly helps prolong its life.
By maintaining your door, you can avoid future issues that lead to worn latch springs. It’s all about keeping an eye out and addressing small problems before they become big frustrations.
In conclusion, repairing a worn latch spring on an interior door might seem daunting at first, but with the right tools and a little patience, you can tackle this project with ease. It’s a simple repair that not only saves you money but also gives you a sense of accomplishment. So, roll up your sleeves and keep your doors swinging smoothly!