You might have a Yale, Schlage, Kwikset, August, or another brand attached to your door. The good news? Most smart deadbolts have similar battery compartments and follow a few simple steps. Let me walk you through the process, step by step, using plain language and real-life advice. By the end, you’ll be changing that battery with total confidence—and maybe saving yourself a locksmith visit down the road.
Why Your Smart Deadbolt Needs New Batteries (And the Signs to Watch For)
Smart deadbolts are clever little devices, but they still depend on plain old batteries, usually AA, AAA, or sometimes a 9V. These batteries power everything from the motor that moves the bolt to the electronics that sync your lock to your phone, keypad, and remote. The moment they run low, you’ll notice a change. Here’s the thing—not all deadbolts warn you in the same way.
Some models flash a tiny light or chirp when the battery’s almost drained. Others might take longer to respond, or suddenly refuse to lock altogether. If you’re using a connected app, you might even get a low-battery warning on your phone. Occasionally, you’ll spot a code or be told to “reset” or “pair” your lock again—which can be a sign the battery just doesn’t have enough juice to keep things running smoothly.
Honestly, it’s better to change the battery sooner rather than later. If you leave it too long, you could get locked out—or lose the “smart” features until you swap in fresh batteries. Staying ahead of it means less hassle, and you’re less likely to need emergency troubleshooting in the middle of a busy morning.
Preparing to Replace the Battery in Your Smart Deadbolt
Before you dive in, let’s get prepared. Changing the battery isn’t complicated, but it pays to be organized. First, check which type of battery your smart lock uses. Most Schlage, Yale, and Kwikset models take four AA batteries. Some older or compact models might use a 9V or even specialty batteries. It’s always smart to look up your model number—or pop open the compartment and check the current batteries—before heading to the store.
Here’s what you’ll need:
- Fresh batteries (the correct type—always use a reputable brand for best results)
- A small screwdriver (some locks need it for the battery cover, others just slide open by hand)
- Your phone or access code (if your lock auto-locks or you want to test it right away)
You don’t need to disconnect anything or reset the lock just to change the batteries. But if you’ve had any weird pairing, syncing, or code issues, this is a good chance to do a quick check and make sure everything’s working before and after the swap. Believe me, it’s much easier than dealing with a lockout.
How to Find and Open the Battery Compartment on Popular Smart Deadbolt Brands
Not every smart lock hides its batteries in the same spot. Most brands make it as painless as possible, but there are a few quirks. Let me walk you through some of the most common designs:
Schlage Smart Deadbolts: Usually, the battery compartment is right under the inside cover (the part facing inside your home). You’ll most likely see a small tab at the top or a thumb screw that you can open without tools. Lift the cover or swing it out, and you’ll spot the batteries lined up neatly.
Yale and August Smart Locks: For these, you’ll typically slide the entire inside cover upward. Some Yale models have a tiny release button at the top. The batteries are stacked in a tray. Gently pull the tray out—there’s no need to force it.
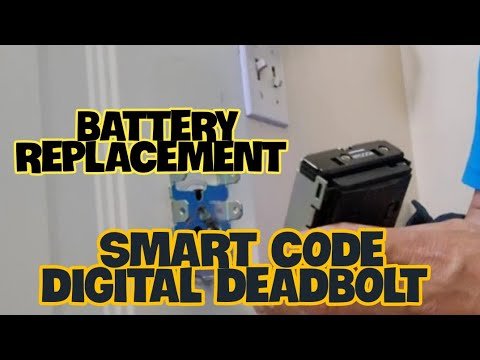
Kwikset SmartCode Deadbolts: These usually have a plastic battery cover that just slides up and off. Sometimes, the batteries are in a small caddy that pops out for easy swapping.
If your lock isn’t listed here, check for a groove, tab, or small screw on the side or back of the inside unit. Manufacturers want you to be able to replace the battery without uninstalling the lock or needing an advanced toolkit.
If you’re ever unsure, take a picture of your battery compartment before removing anything. It makes reassembly way less stressful.
Step-by-Step: Changing the Battery in Your Smart Deadbolt
You might be wondering if you’ll need to reset, sync, or re-pair your smart lock after a battery change. Good news: in 99% of cases, a simple swap gets you right back to normal, with all codes and settings intact. Here’s how to do it in a way that works for almost every major brand:
- Unlock your deadbolt first. It’s easier to work with, and you won’t risk being locked out afterwards.
- Open or remove the battery cover. Use your fingers or a small tool as needed—be gentle, as the plastic can break if forced.
- Take out the old batteries. Note their orientation. Most battery trays show you which way they go, but a quick glance never hurts.
- Insert the new batteries. Make sure they’re all facing the right direction and firmly in place. If the model uses a battery tray, slide it back in until it clicks.
- Replace the cover. Make sure it’s fully secured—otherwise, the lock may not power up properly.
- Test your lock. Use your keypad, app, or key to make sure the lock operates smoothly, and check for any error lights or codes.
If your lock doesn’t respond after the swap, check the orientation of the batteries and that the tray or cover is properly seated. Occasionally, resetting the lock (usually by holding a button or removing the battery again for a few seconds) can jumpstart things if it’s being fussy.
Troubleshooting After a Battery Change
Here’s the thing—sometimes a battery swap doesn’t go as smoothly as planned. The lock might refuse to pair with your phone, ignore keypad codes, or flash a funny light. Don’t panic. Usually, the fix is simple.
First, double-check that all batteries are new and inserted correctly. Weak or mismatched batteries can be enough to cause weird issues. If your lock needs to sync with a hub (like Zigbee, Z-Wave, or a WiFi bridge), it may take a minute or two after the battery change to reconnect. Some locks require you to press a “program” or “pair” button after putting in new batteries—look for a tiny button inside the compartment.
If you’re getting an error code or your lock still acts dead, try resetting it:
- Remove the new batteries
- Wait 30 seconds
- Reinsert batteries and test again
Still stuck? A quick search for “[your brand] smart lock troubleshooting battery change” will usually get you to the right support page, or check your manual for specific reset steps. Rarely, the lock’s firmware can glitch, but most owners never run into that.
Comparing Battery Replacement for Universal vs. Brand Smart Deadbolts
Not every smart deadbolt is tied to a big brand—even generic or “universal” models are out there, often with similar features but a different take on the battery compartment. Honestly, the process is mostly the same, but here’s what to keep in mind:
- Universal locks tend to use standard AA or AAA batteries, but their compartments can be trickier to open. Always use gentle force, since plastic tabs can snap.
- If you bought your lock online from a less-known brand, double-check the manual for unique steps—some have hidden screws or a setup code you’ll need if you do a full reset.
- Replacement parts for major brands (like trays or covers) are easier to find than for off-brand models, so be extra careful not to lose or damage them.
No matter the brand, the basic skill of swapping batteries and checking for a good fit applies. If your lock uses a built-in rechargeable battery (rare, but some do), you’ll need to remove it and plug it in to a USB cable for charging—pretty much like charging a phone.
How Often Should You Change the Battery in Your Smart Lock?
You might be wondering: do you really have to wait until the lock warns you, or is there a routine for battery swaps? Here’s what most experts (and experienced owners) recommend.
Smart deadbolt batteries usually last six months to a year, depending on how much you use the lock and whether it’s connected to WiFi or a smart home hub. High-traffic doors, or locks set to auto-lock often, will run down batteries faster. Honestly, you’ll get the best performance if you make a habit of checking or changing the batteries every 8–12 months—even if you don’t see a warning light yet.
- Try replacing batteries every fall or spring as a routine, so you’re never caught by surprise.
- Don’t mix old and new batteries, or brands—it weakens performance and can cause trouble syncing or resetting.
- If you live somewhere with big temperature swings, consider swapping batteries a little sooner. Extreme cold and heat can drain them faster.
Getting into a regular habit not only protects your lock, but also avoids the stress of last-minute lockouts and emergency code resets.
Staying Ahead: Tips for Extending Smart Deadbolt Battery Life
If you want to get the most out of every set of batteries, a few small changes really help. For starters, always use high-quality batteries from a trusted brand—cheap ones tend to die quicker and can even leak over time, which is the last thing you want inside your lock.
Next, check your lock’s settings through its app or remote (if it’s connected). Features like frequent auto-locking, beeping, or connecting to WiFi can burn through power faster. If you don’t need a specific feature, disabling it can stretch your battery life. Here’s a tip: if your lock lets you adjust code or sync intervals, set them a bit longer.
Finally, keep your lock’s firmware updated. Brands like Yale, August, and Schlage push out updates now and then that improve battery efficiency. Usually, you can update through your app—just follow the instructions, and you’ll know your lock is running its best.
A smart lock is only as good as the battery that powers it. A little attention goes a long way toward staying secure and stress-free.
Wrapping Up: Never Get Locked Out by a Dead Smart Lock Battery Again
Changing the battery in your smart deadbolt isn’t rocket science, but it does make you feel just a bit like a tech wizard. With a few minutes of hands-on work—and a fresh set of the right batteries—you’ll have your Yale, Schlage, Kwikset, or generic model up and running like new. The main takeaways? Always unlock your door before starting, use good batteries, pay attention to the orientation, and don’t be afraid to troubleshoot if something seems off.
Once you’ve done it once, it’s just another part of home upkeep—like changing a smoke detector or updating a code. Keep an eye out for those warning signs, and you’ll never be stuck outside staring at a blinking keypad again. Here’s to keeping your smart home locked up tight—and always powered up.