Replacing a standard 2-3/8 inch backset latch is a straightforward job, even if you’re just getting your feet wet with DIY projects. With a few tools, and a bit of patience, you can tackle this change in no time. Let’s dive into the nitty-gritty of how it works, what you need, and the steps to replace that latch properly.
Understanding the 2-3/8 Inch Backset Latch
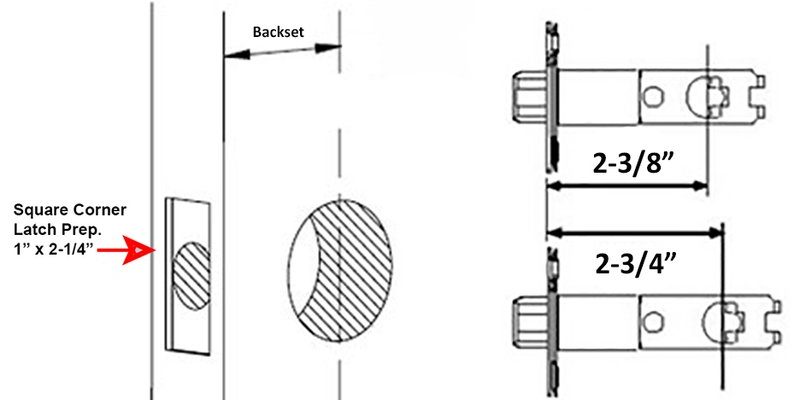
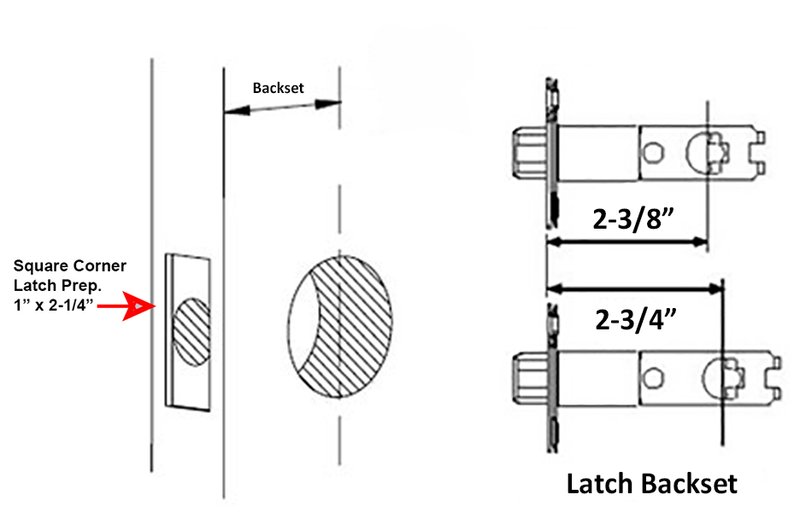
A backset refers to the distance from the edge of the door to the center of the lock or latch. The standard measurement for many interior doors is 2-3/8 inches. Why does this matter? If you choose the incorrect backset, your new latch won’t fit snugly, and you’ll end up back where you started—frustrated and with an unfinished project.
The latch itself is the mechanism that holds your door shut. When you push the doorknob, the latch retracts, allowing the door to open. If you hear a scraping sound or if the door isn’t closing properly, it’s likely time for a replacement. Understanding how this all works will make the replacement process feel less daunting.
Tools You’ll Need for the Job
Before jumping into the replacement, it’s wise to gather your tools. This will make your task more efficient and enjoyable. Here’s what you’ll need:
- Screwdriver: A flathead and Phillips screwdriver will cover most screws you’ll encounter.
- Tape measure: To confirm the backset measurement of your existing latch.
- Drill: If you need to create new holes, a drill will be handy.
- Pry bar or putty knife: Useful if you need to remove the old latch without damaging the door.
Having these tools on hand will prepare you for the entire process, making sure you won’t need to make last-minute runs to the hardware store.
Selecting the Right Replacement Latch
Now that you have your tools, it’s time to choose a replacement latch. Some people may wonder if all latches are the same. Here’s the thing—while they may appear similar, there are variations.
You’ll want to look for a latch that matches your current 2-3/8 inch backset measurement. Brands like Schlage, Kwikset, and Defender offer reliable options. If you’re feeling adventurous, consider looking into smart latches that integrate with your home’s security system. They often allow for remote access, which can be quite handy.
Regardless of the brand, ensure the latch is easy to install and comes with clear instructions. This way, you won’t find yourself scratching your head halfway through.
Removing the Old Latch
With your new latch ready to go, let’s tackle the old one. Start by closing the door and locating the screws on the doorknob. Remove these with your screwdriver, and then take out the latch. It might feel secure, so don’t hesitate to use your pry bar if necessary.
Here are the steps to follow:
1. Unscrew the doorknob: Start with the knobs on both sides of the door.
2. Take out the old latch: Once the knobs are off, remove the screws holding the latch in place.
3. Pry gently if needed: If it’s stuck, use your putty knife to gently release it from the door.
Once the old latch is out, you’re ready to install the new one!
Installing the New Latch
Now comes the fun part! Installing your new 2-3/8 inch backset latch is where you can see your efforts come to life. Here’s how to do it:
1. Position the new latch: Slide it into the hole where the old latch was installed.
2. Secure it: Use the screws from your new latch to fasten it in place.
3. Reattach the doorknobs: Make sure both sides are tightly secured to ensure functionality.
Take a moment to double-check everything. Make sure the latch retracts smoothly as you turn the doorknob.
Testing the New Latch
After installing, it’s crucial to test your work. You want to ensure the new latch works flawlessly. Here’s a quick testing checklist:
– Close the door: Ensure alignment with the strike plate.
– Turn the doorknob: The latch should retract smoothly without resistance.
– Check the lock: If you installed a locking mechanism, test this feature as well.
If you encounter any issues, don’t panic! Sometimes latches can be slightly misaligned, which is easily adjustable.
Common Issues You May Encounter
Even the most straightforward projects have their hiccups. You might be wondering what problems could crop up during your latch replacement. Here are a few common ones:
– Incorrect backset: If your new latch doesn’t fit, double-check the measurement—sometimes the numbers can be misleading.
– Misalignment: If the latch doesn’t engage smoothly, check to see if it’s lined up with the strike plate.
– Loose screws: Make sure everything is tightened down securely. Loose screws can cause the latch to function poorly.
Understanding these issues can save you a lot of frustration. Don’t hesitate to revisit the instructions if something seems off.
Final Thoughts on Replacing Your Door Latch
Replacing a standard 2-3/8 inch backset latch on an interior door may seem like a small detail, but it can make a big difference in your home’s functionality. With the right tools, a good latch, and some patience, you can enhance security and usability in your space.
Just remember, it’s okay if things don’t go perfectly on your first try. DIY projects are all about learning and growing—kind of like a fun puzzle. Embrace the process, and enjoy the satisfaction of completing a task that contributes to your home’s comfort and safety!