Privacy door knobs work differently than regular door knobs because they allow you to lock the door from the inside while still being easy to open from the outside in case of an emergency. This feature makes them perfect for bathrooms and bedrooms. In this article, we’ll walk through the steps to replace that stubborn inner part of the knob, using a standard privacy door knob as our example. Let’s dive in!
Why Replace the Inside Half of a Privacy Door Knob?
You might be wondering, why bother replacing just the inner half of a privacy door knob? Well, there are a few reasons this might be on your to-do list. First, wear and tear can cause parts to malfunction over time. If your knob is difficult to turn or doesn’t lock properly, it could be a sign that something’s gone awry inside.
Additionally, sometimes it’s a simple case of aesthetics; you may want to swap out that old knob for something more stylish, or it just doesn’t match your home décor anymore. The good news is that replacing the inner half of the knob is often cheaper and easier than buying an entirely new set. You can fix it quickly without a complete overhaul.
Another common issue might be that the locking mechanism sticks, which can be pretty annoying. Luckily, replacing the inside half is a pretty simple DIY project that doesn’t require extensive tools or experience. Seriously, if you can use a screwdriver, you can tackle this!
Gather Your Tools and Materials
Before diving into the project, it’s essential to gather everything you need. A little preparation goes a long way. Here’s a quick list of what you’ll need:
- Screwdriver: A flathead or Phillips screwdriver, depending on your knob’s screws.
- Replacement inner knob: Make sure it matches your existing outer knob.
- Locking mechanism: If you think the lock is also faulty, grab a replacement mechanism.
- Lubricant: Optional, but a little can help new parts run smoothly.
- Tape measure: To ensure a good fit, especially if you’re switching styles.
Having these tools on hand will ensure you don’t have to run to the store halfway through the process. Trust me, that can be frustrating!
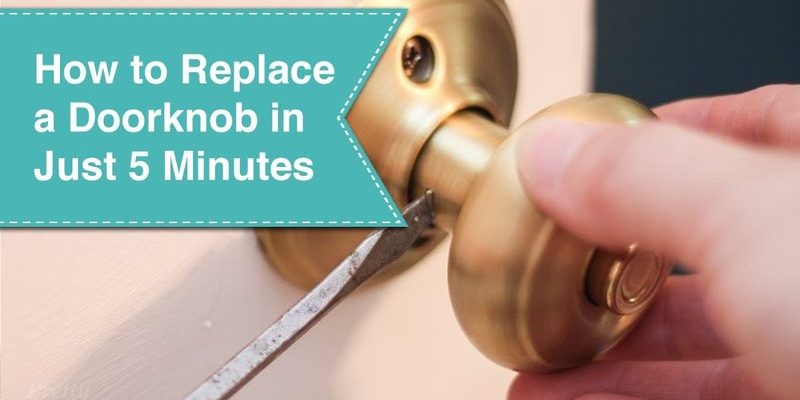
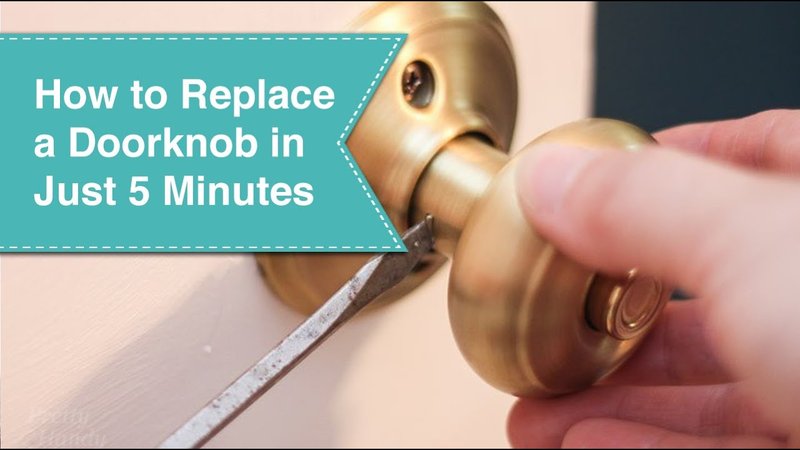
Removing the Old Inner Half
Now let’s get to the fun part—removing that old knob. Here’s how to do it step by step:
1. Locate the Screws: Most privacy knobs have screws hidden beneath the decorative plate or on the knob itself. If you don’t see any, look for a small hole on the side or bottom.
2. Remove the Screws: Use your screwdriver to take out the screws. Keep them in a safe spot because you might need them later.
3. Pull Apart the Knob: Gently twist and pull the inner knob away from the door. If it doesn’t budge, check for any remaining screws. Sometimes, it helps to wiggle it a bit.
Once you’ve got the inner part off, take a moment to inspect the locking mechanism. If it looks broken or rusty, now’s the time to replace it too!
Installing the New Inner Half
With the old knob out, it’s time to install the new inner half. This process is usually as easy as pie:
1. Align the New Knob: Take your new inner knob and line it up with the door. Make sure that it fits snugly into the latch mechanism.
2. Secure It: Insert the screws back into their original holes. Tighten them gently; you want a secure fit but avoid over-tightening, which can crack the knob.
3. Test the Lock: Before you finish up, turn the knob and test the locking mechanism. It should turn smoothly, and the lock should engage without a hitch.
You might find it helpful to use a little lubricant on the locking mechanism to ensure it moves fluidly. Just a drop will do!
Testing Your New Privacy Door Knob
After installing the new inner knob, you want to make sure everything works perfectly. Here’s what to do:
1. Close the Door: Secure your privacy by closing the door completely.
2. Lock and Unlock: Test the lock by turning it and ensuring it clicks securely. Unlock it a few times to make sure the mechanism moves easily.
3. Check the Handle: Make sure the knob turns smoothly without much effort. If you notice any sticking, a tad more lubricant could help.
If everything feels good, congratulations! You’ve just successfully replaced the inside half of your privacy door knob.
Common Problems and Troubleshooting
Sometimes, things don’t go as planned. It’s part of life! Here are a few issues you might encounter, and how to solve them:
– Knob Doesn’t Turn: If the knob feels stuck, double-check that all screws are tight. A loose screw can cause misalignment.
– Lock Doesn’t Engage: Ensure that the locking mechanism is installed correctly. A piece might be in the wrong position. Take apart the knob and realign the parts if necessary.
– Loose Knob: If the knob feels wobbly after installation, this usually means the screws weren’t tightened enough. Just give them a gentle twist with your screwdriver.
Remember, troubleshooting is part of DIY life. Don’t stress if you don’t get it right the first time!
Final Thoughts on Replacing Your Privacy Door Knob
Replacing the inside half of your privacy door knob is a small project that can make a big difference in your home. Not only does it restore functionality, but it can also refresh the look of your space without breaking the bank. And the best part? You did it yourself!
With a little patience, a few basic tools, and this guide in hand, you can tackle this home improvement project confidently. So the next time that door knob acts up, you’ll know exactly how to handle it. Happy DIYing!