Replacing the latch faceplate is not just about aesthetics, though it can definitely freshen up your door’s look. It’s about making sure everything operates smoothly. It’s a bit like changing the oil in your car; it may seem minor, but it keeps everything running nicely. In this guide, I’ll walk you through how to replace the latch faceplate on an interior door, step by step, so you can avoid those frustrating moments in the future.
What Is a Latch Faceplate?
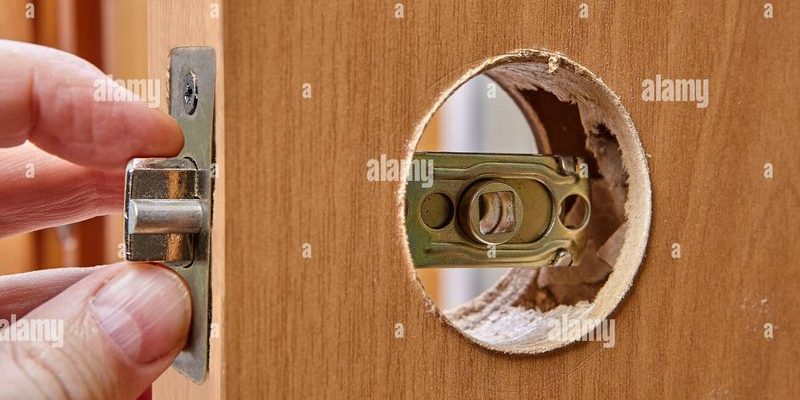
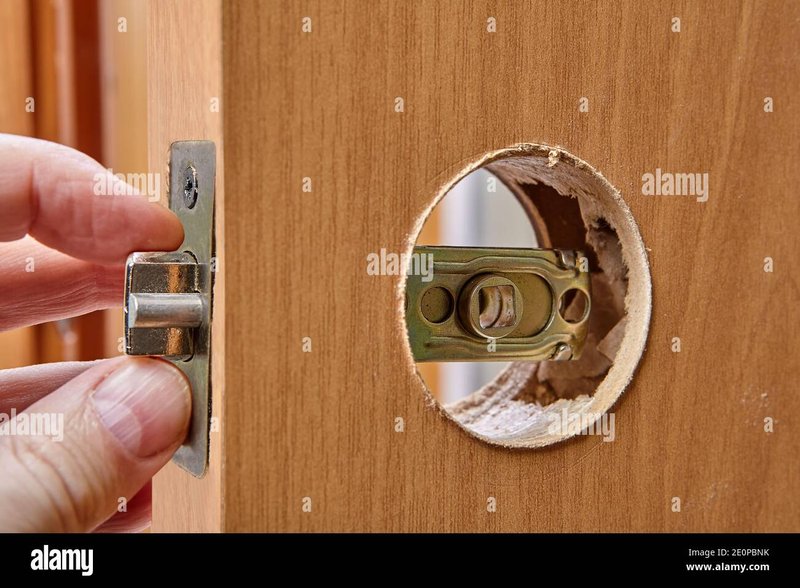
Before diving into the replacement process, let’s clarify what a latch faceplate actually is. This is a rectangular piece of metal that covers the cutout at the edge of your door where the latch bolt extends when you close the door. Think of it as the door’s protective shield. It not only ensures the latch functions correctly but also protects the door’s structure from wear and damage over time.
The faceplate is usually attached with screws and comes in various finishes and sizes, meaning you might have to pay attention to what you’re currently working with. Over time, faceplates can get scratched, bent, or even chipped, which can prevent the latch from catching properly. If you notice any of these issues, it’s time to consider replacing it.
Tools Needed for the Job
Now that we understand what a latch faceplate is, let’s gather our tools. Replacing this component is a straightforward process, but having the right tools on hand makes all the difference. Here’s a quick list:
- Screwdriver: A flathead and/or Phillips screwdriver will work depending on the screws in your latch faceplate.
- Measuring Tape: For measuring the new faceplate accurately.
- Replacement Latch Faceplate: Make sure to choose one that matches your existing door hardware.
- Utility Knife: Helpful for cleaning up any rough edges around the door.
- Wood Filler (optional): If your door has minor damage, this can help smooth it out before installing the new plate.
With these tools, you’re well on your way to having a fully functioning door once again.
Steps to Remove the Old Latch Faceplate
Replacing the latch faceplate involves several straightforward steps. First, you need to remove the old one. Here’s how you do it:
1. Inspect the Current Faceplate: Start by closely examining the latch faceplate. Look for screws that are holding it in place, typically located on the outer edges.
2. Unscrew the Faceplate: Using the appropriate screwdriver, slowly unscrew each screw. Be gentle, as you don’t want to strip the screws. Place them in a safe spot—you’ll need them later for the new faceplate.
3. Take Off the Faceplate: Carefully pull the faceplate away from the door. If it feels stuck, gently wiggle it until it comes off.
4. Inspect the Latch Mechanism: Take a moment to check the latch mechanism itself. If it’s worn or damaged, you may want to consider replacing it as well.
Once you’ve removed the old faceplate, it’s time to prepare for the new one.
Preparing the Door for the New Faceplate
With the old faceplate out, you should clean up the area before installing the new one. This is an important step that often gets overlooked. Here’s what to do:
1. Clean the Area: Use a damp cloth or sponge to wipe down the area where the new faceplate will go. If you see any paint or debris, use a utility knife to scrape it off gently.
2. Check the Alignment: Use your measuring tape to ensure the new faceplate aligns perfectly with the existing hole. If the hole is too large or uneven, you may need to fill it with wood filler and sand it down for a smooth finish.
3. Test the Latch: Before moving forward, insert the latch to ensure it fits properly in the opening. This saves time later on.
Taking these extra steps ensures that the new faceplate fits snugly and functions as it should.
Installing the New Latch Faceplate
Now comes the exciting part—installing the new latch faceplate. Follow these steps for a smooth installation:
1. Position the New Faceplate: Place the new faceplate over the opening, ensuring it’s centered and level.
2. Insert the Screws: Using your screwdriver, start by inserting the screws in one corner, then move to the opposite corner, tightening each gradually. This allows for even alignment.
3. Tighten the Screws: Go back and forth between the screws, tightening them until the faceplate is secure. Don’t overtighten, as this can warp the faceplate or strip the screws.
4. Test the Latch: Once the faceplate is securely attached, test the latch to see if it catches appropriately when the door is closed. If it doesn’t catch or feels loose, you might need to make minor adjustments.
Installing the new faceplate is mostly straightforward, and if done properly, it should feel secure and functional.
Common Issues and Troubleshooting
Even with a straightforward job like replacing a latch faceplate, issues can arise. Here are a few common problems and solutions:
– Faceplate Doesn’t Fit: If the new faceplate doesn’t align with the latch, double-check the measurements. If necessary, trim the faceplate or adjust the latch’s position.
– Latch is Sticking: If the latch sticks after installation, it may need lubrication. A little bit of WD-40 or a similar lubricant can help.
– Screws Not Holding: If the screws keep coming loose, you might need to use wood filler to strengthen the area around the screws before reattaching the faceplate.
By anticipating these issues, you can save yourself time and frustration.
Finishing Touches and Maintenance
After replacing the latch faceplate, it’s important to ensure everything is in tip-top shape. Here’s how:
1. Check Alignment Often: After a few days, check to see if the door is functioning as it should. Sometimes things can settle, and a quick adjustment might be necessary.
2. Regular Maintenance: Keep an eye on the condition of the latch and faceplate. Regularly cleaning them can help prolong their lifespan.
3. Be Mindful of Door Swelling: In humid conditions, doors can swell, affecting how the latch interacts with the faceplate. If you notice any sticking, address it promptly.
With these last touches, your door will not only look great but will function properly for years to come.
In conclusion, replacing the latch faceplate on an interior door is a manageable DIY project that can dramatically improve the functionality of your door. Armed with basic tools and a little patience, you can tackle this project yourself. Remember, it’s all about ensuring that your door operates smoothly and effectively. So next time you encounter a stubborn door, you’ll know exactly what to do!