Let’s think about it like this: imagine you’re at a party, and the music’s just a touch too loud. You don’t want it to be silent, but you also want to hear yourself think. That’s exactly what adjusting a self-closing hinge is like. It’s about finding that sweet spot for your door—where it closes smoothly but not with a bang. In this guide, we’ll walk through how to adjust a self-closing hinge so you can tweak the closure speed to fit your needs.
Whether you’re dealing with a door in your home, office, or even a gate, understanding how to adjust these hinges can save you time and hassle. Let’s dive in!
What Are Self-Closing Hinges?
Self-closing hinges are clever little devices that do the heavy lifting for you when it comes to closing doors. They are commonly used in places like kitchens, bathrooms, and even commercial spaces. The beauty of these hinges lies in their spring mechanism, which allows them to pull the door shut automatically after it’s been opened.
You might have come across several types of self-closing hinges, such as piano hinges, spring-loaded hinges, and offset hinges. Each has its own unique design and function, but they all share the same core purpose: to ensure doors close on their own. The key component at play here is the spring—a simple yet powerful mechanism that needs to be adjusted correctly for optimal performance.
If you’ve ever fiddled with a door only to find it slams shut or drags on the floor, you know how frustrating it can be. Fortunately, adjusting these hinges is more straightforward than it sounds. All it takes is a little know-how and perhaps a few tools.
Why Adjust the Closing Speed?
You might be wondering why you would want to adjust the closing speed of a self-closing hinge in the first place. Well, there are several reasons!
- Safety: A door that closes too fast can be a hazard, especially for little ones or pets. Adjusting the speed can help prevent accidents.
- Noise control: If a door slams shut, it can be noisy and disruptive. Slowing it down a bit can make a significant difference.
- Wear and tear: Fast-closing doors can lead to damage over time. By adjusting the closure speed, you can prolong the life of the hinge and the door itself.
- Convenience: A slower closing door allows you to pass through without having to rush. This is especially useful in busy households.
Making these adjustments not only benefits the door itself but gives you a more comfortable and safer environment at home or work.
Tools You’ll Need
Before you dive into adjusting your self-closing hinge, it’s a good idea to gather a few tools. This will make the process smoother and help you tackle any challenges that might come up. Here’s a quick list of what you’ll need:
- Screwdriver: A flat-head or Phillips screwdriver, depending on your hinge screws.
- Level: To ensure your door is aligned correctly after adjustments.
- Tape Measure: Helpful for checking door positioning.
- Safety glasses: Always a good idea when working with tools!
Having these tools ready will save you time and frustration, letting you focus on adjusting that hinge to perfection.
Steps to Adjust the Hinge
Now that you’re equipped with the right tools, it’s time to adjust your self-closing hinge. Here’s a step-by-step guide to help you through the process.
1. Identify the Type of Hinge
First things first, take a closer look at your hinge. Some hinges have an adjustment screw, while others might require different methods for tweaking. Knowing what type of hinge you’re working with is key. If you have a spring-loaded hinge, look for a small screw on the side or top. If it’s an offset hinge, adjustments might be at the pin.
2. Adjust the Tension
For most self-closing hinges, adjusting the tension changes how quickly or slowly the door closes. To do this:
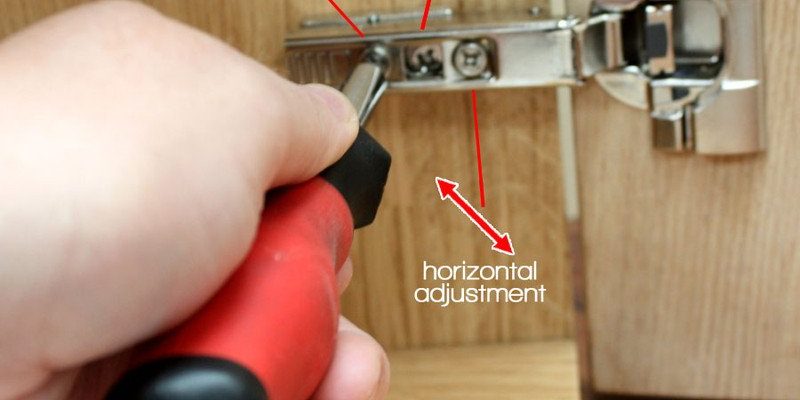
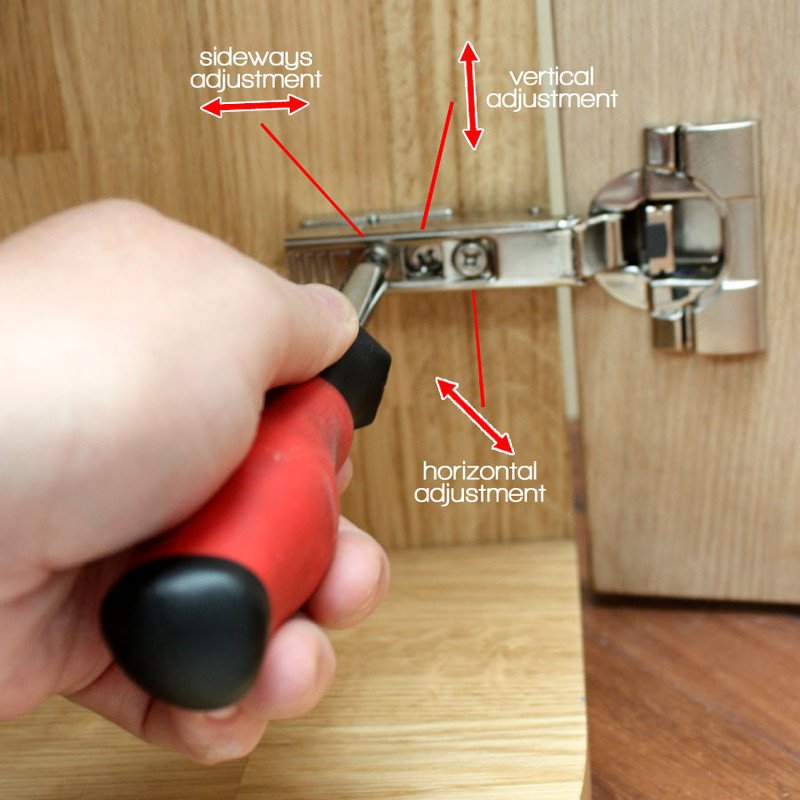
– Locate the tension adjustment screw. Usually, it’s found on the hinge arm.
– Turn the screw clockwise to increase tension for a faster closure. If you want it to close more slowly, turn it counterclockwise.
– Make small adjustments, a quarter of a turn at a time, to see how it affects the closure speed.
3. Test the Door
After making your adjustments, it’s time for some testing! Open the door fully and let it go. How does it close? Does it slam shut, or does it drag? If it’s not just right, return to the adjustment screw and tweak it again.
Consider doing this multiple times, as it may take a few tries to get it just right. Patience is key here—it’s not just about the door; it’s about the overall experience!
4. Finalize Your Adjustments
Once you’ve found the perfect speed, check that everything is aligned properly. Use your level to ensure the door is straight. Also, make sure there are no gaps between the door and the frame when it’s closed. If everything looks good, you’re all set!
Troubleshooting Common Issues
Adjusting a self-closing hinge isn’t always smooth sailing. Sometimes, you might run into issues. Here are some common problems and how to tackle them.
- Door Slams Shut: If your door is still slamming after adjustments, you may need to decrease the tension further. Turn that screw a bit more counterclockwise.
- Door Doesn’t Close Fully: If the door won’t close completely, check the alignment. You may need to adjust the hinges or the latch alignment.
- Uneven Closing: If one side is closing faster than the other, make sure both hinges are adjusted equally.
By keeping these troubleshooting tips in mind, you’ll be able to tackle any potential problems with confidence.
When to Replace the Hinge
Sometimes, no matter how much you adjust, the hinge just won’t cooperate. If your hinge is old, rusted, or damaged, it may be time for a replacement.
Look for signs like:
– Loose screws that won’t tighten.
– Visible wear, such as cracks or breaks.
– Difficulty in opening or closing even without self-closing features.
Replacing the hinge can often be a quick solution that brings your door back to life, saving you from future headaches.
Wrapping It Up
Adjusting a self-closing hinge is a practical skill that can make a significant difference in your everyday life. Whether it’s making your home safer or simply eliminating annoying slams, understanding how to tweak these hinges is worth the effort.
Take your time, follow the steps, and remember that the right adjustments can lead to a smoother, quieter door experience. The next time you walk through that door, it’ll feel just right—just like the perfect playlist at a party. Happy adjusting!