Now, replacing that broken spring isn’t as complex as it sounds. With a bit of perseverance and the right tools, you can tackle this issue yourself. Today, we’ll break down the process step by step, so you can get that door knob back in working order without calling in a professional. So grab your tools, and let’s get started!
Understanding the Basics of Interior Door Knobs
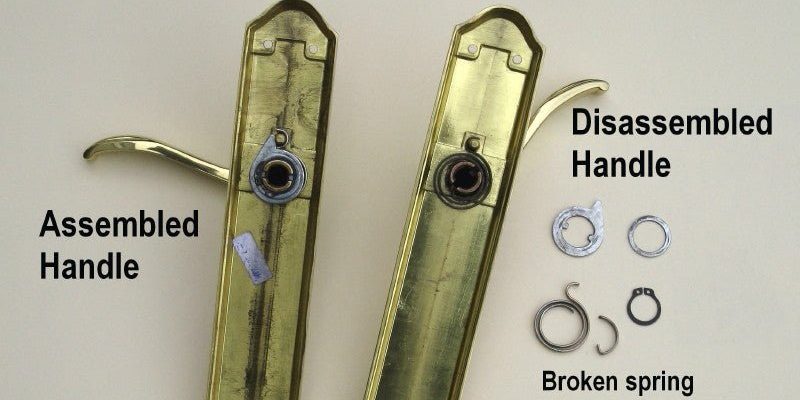
Interior door knobs come in various styles and functions, but they all rely on a few common components. At the heart of each knob is a cylindrical mechanism that allows it to turn and latch or unlatch the door. Within that mechanism lies the spring—typically a small coil that helps the knob return to its original position after being turned.
If the spring breaks, the knob may feel loose, stick, or become completely immovable. Knowing this, you can understand why replacing the spring is crucial for maintaining your door’s functionality. Door knobs can be classified into two types: passage knobs, which allow free movement, and privacy knobs, which can be locked. Both types can have similar internal workings, so the process of replacing a spring remains fairly consistent.
Gathering Your Tools and Materials
Before diving into the repairs, it’s essential to gather the right tools and materials. Here’s what you’ll need:
- Screwdriver: A flathead or Phillips screwdriver, depending on the screws used in your door knob.
- Replacement spring: You can find these at a local hardware store or online. Ensure that it’s compatible with your door knob brand.
- Pliers: Helpful for removing stubborn parts.
- Lubricant: A small amount of silicone spray or WD-40 to keep everything moving smoothly once repaired.
Having these items on hand will save you multiple trips to the store and make the process smoother. Honestly, the more prepared you are, the easier the repair will go!
Removing the Door Knob
Once you have your tools ready, it’s time to remove the door knob. Here’s how to do it:
1. Locate the screws: Most knobs will have visible screws on the plate or hidden beneath a decorative cover. If they’re hidden, gently pry off the cover with your screwdriver.
2. Unscrew the knob: Using your screwdriver, carefully remove the screws. Be cautious not to damage the wood or door frame in the process.
3. Detach the knob: After unscrewing, gently pull the knob apart from the door. If it feels stuck, wiggling it back and forth can help loosen it.
This can feel a bit like a puzzle, but with patience, you’ll have the knob off in no time!
Inspecting the Mechanism
With the knob removed, take a moment to inspect the internal mechanism. Look for the spring and see if it’s broken or dislodged. If it’s broken, you’ll need to replace it. This is also a good time to check for any other wear and tear.
Here’s what to look for:
– Broken or stretched spring: If you see any visible breaks or if the spring seems longer than it should, it’s time for a replacement.
– Worn gears: Sometimes, the gears inside the knob can wear down, leading to functionality issues. If they’re worn, you might need to consider whether a complete knob replacement is necessary.
Taking the time to inspect now will help prevent future issues and keep your door knob functioning well.
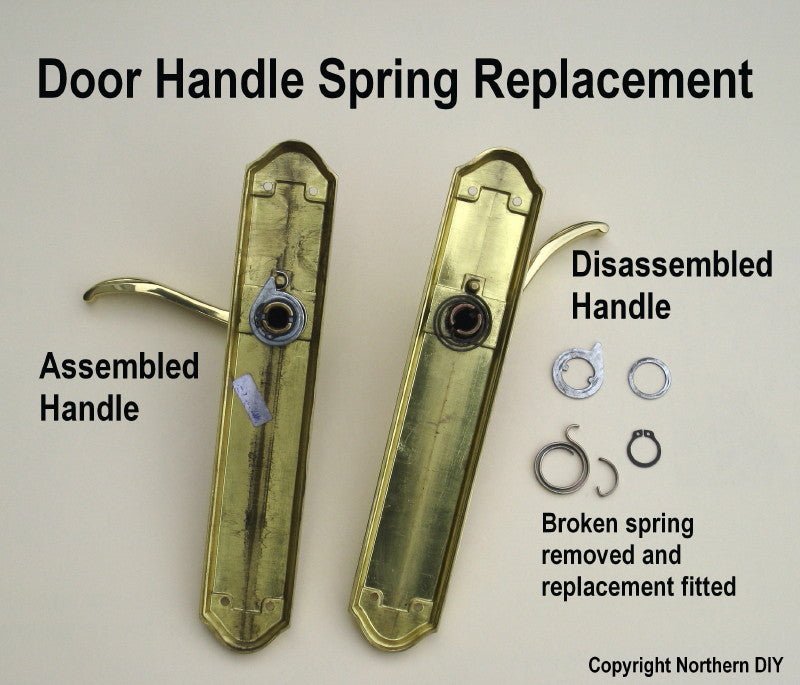
Replacing the Spring
Now for the moment of truth: replacing the broken spring. Here’s how to do it, step by step:
1. Remove the old spring: If the spring is still somehow attached, carefully pull it out. You might need to use your pliers here to get a good grip.
2. Install the new spring: Take your replacement spring and insert it into the same slot where the old one was. It should fit snugly. Make sure it’s seated correctly—this is crucial for the knob to function again.
3. Check the mechanism: Before reassembling the knob, press the mechanism to see if the new spring works properly. You should feel a bounce back; if it feels loose, double-check that the spring is seated properly.
Replacing the spring is like reinvigorating a tired old friend—it gives your knob a new lease on life!
Reassembling the Door Knob
Once you’ve replaced the spring and ensured everything is working well, it’s time to put the door knob back together. Here’s how:
1. Align the knob: Position the knob back onto the spindle. Ensure it aligns properly with the door’s latch mechanism.
2. Screw it back in: Using your screwdriver, reattach the screws you removed earlier. Tighten them gently—too much force can strip the screws or damage the knob.
3. Cover the screws: If your knob had a decorative cover, snap it back into place.
It’s similar to putting together a jigsaw puzzle; each piece needs to fit correctly for the final product to look and work well.
Testing the Door Knob
After everything is back in place, it’s time to test your hard work. Turn the knob a few times and listen for any unusual sounds. It should turn smoothly without resistance.
Also, check the latch by closing the door and turning the knob to ensure it latches and un-latches correctly. If everything feels good, you’ve successfully replaced the broken spring!
If the knob still isn’t working correctly, double-check that the spring is seated properly and that the mechanism isn’t stuck. If you’re still having issues, it might be time to consider whether the entire knob needs replacement.
When to Replace the Entire Door Knob
Sometimes, despite your best efforts, replacing just the spring isn’t enough. Here are a few signs that you might need a whole new door knob:
– Severe wear and tear: If other components show signs of damage, it may be more efficient to invest in a new knob.
– Obsolete design: Older knobs can sometimes be difficult to find parts for. If yours is dated, consider upgrading to a more modern, easily serviceable design.
– Frequent issues: If you find yourself fixing your knob repeatedly, it’s likely time to let it go. A new knob can save you hassle in the long run.
Knowing when to replace rather than repair can save you time and frustration—sometimes, newer is really better.
Final Thoughts
Replacing a broken spring on an interior door knob may seem like a daunting task, but with a little patience and the right tools, you can do it yourself. It’s empowering to know that you can manage small repairs around your home.
Remember to approach the process step by step, and don’t hesitate to inspect all components involved. With a bit of effort, you’ll be back to smoothly turning that door knob in no time. Happy repairing!