Imagine your door hinges as the backbone of your door. If they’re weak or stripped, it’s like trying to stand up with a shaky spine. This guide will walk you through some effective solutions, including how to handle stripped screw holes—a common issue many homeowners face. Whether you’re a DIY novice or just looking to spruce up your home, these practical tips will have your door swinging smoothly in no time.
Understanding the Basics of Door Hinges
Before diving into solutions, it helps to understand what door hinges do. Hinges are the pivotal points that allow doors to swing open and shut. They’re made up of two plates, one attached to the door and the other to the door frame. When properly installed, hinges should support the weight of the door and allow it to move freely without excessive wobbling.
Loose hinges can lead to a range of problems. They may cause the door to stick, produce loud creaking sounds, or even leave gaps between the door and the frame, affecting both privacy and energy efficiency. If neglected, loose hinges might eventually lead to more severe damage, so it’s best to tackle them right away.
Signs You Need to Tighten Door Hinges
You might be wondering how to tell if your door hinges need attention. Here are some common signs that can help you identify the issue:
- Sagging Doors: If your door hangs lower on one side, this is a clear indicator of loose hinges.
- Creaking Sounds: Listen for noises when you open or close the door; persistent creaks are a cry for help.
- Difficulty Closing: If you find yourself pushing or pulling more than usual to close the door, it’s time to check the hinges.
Identifying these signs early can save you from more extensive repairs down the line. Plus, it’ll keep your door functioning smoothly, making everyday life just a bit easier.
Gathering the Right Tools
Now that you know why it’s important to address loose door hinges, let’s talk tools. Don’t worry; you won’t need a full workshop for this task. Here’s a quick list of what you’ll need:
- Phillips Head Screwdriver: Most door hinges use Phillips screws, making this tool essential for tightening.
- Drill or Screw Gun: If the screws are particularly stubborn, a drill can make the job quicker.
- Wood Filler or Toothpicks: These can help reinforce stripped screw holes.
- Replacement Screws: Sometimes, the screws themselves might be worn out, so having extras on hand is wise.
Having the right tools will set you up for success, allowing you to tackle this home repair with confidence.
How to Tighten Loose Hinges
Once you have your tools ready, follow these steps to tighten those loose hinges:
1. Remove the Screws: Using the Phillips head screwdriver, remove the screws from the hinge. Take note of how they are positioned; you’ll want to put them back in the same way.
2. Inspect the Hinge: Check for any damage to the hinge itself. If it looks bent or broken, consider replacing it entirely.
3. Tighten the Screws: If the screws are loose but the hole is still intact, simply tighten them back in. Use your screwdriver or drill to ensure they’re snug.
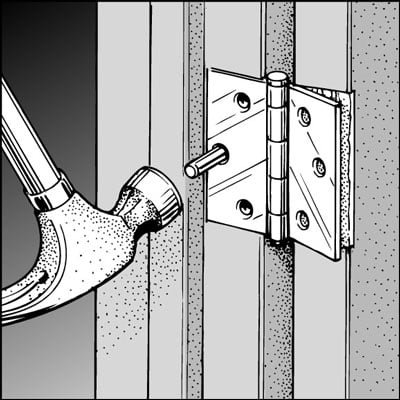
4. Reinforce Stripped Holes: If the screw holes are stripped, we’ll need to reinforce them. Here’s how:
– Fill the stripped hole with wood filler and let it dry, or
– Insert toothpicks with wood glue to create a stronger grip for the screws.
5. Reattach the Hinges: Once the filler is dry or the toothpicks are in place, reattach the screws and tighten them securely.
By following these steps, you should see an immediate improvement in how your door hangs and operates.
Fixing Stripped Screw Holes
Stripped screw holes can be a real pain, but they’re not the end of the world. Here are a couple of methods to fix this common problem:
1. Toothpick Method: This is a quick fix that works for many situations. Simply take a few wooden toothpicks, dip them in glue, and insert them into the stripped hole. Once they’re in, snap off the excess toothpick sticking out. After it dries, you can reinsert the screw into the newly reinforced area.
2. Wood Filler Method: For a more permanent solution, wood filler is your best bet. Fill the hole with the wood filler, smooth it out, and let it dry completely. Once it’s dry, you can drill a new hole or use the existing one to reattach the screw.
Both methods can save you from replacing the entire hinge or door, which can be a more complicated and costly solution.
Preventing Future Issues
Once you’ve tightened your hinges, you’ll want to keep them in good shape for as long as possible. Here are a few tips to prevent future problems:
- Regular Maintenance: Check your hinges every few months to ensure they’re still tight and functional.
- Lubrication: Apply some lubricant to the hinges to keep them from creaking and to help them move smoothly.
- Gentle Handling: Be mindful when using your doors; slamming them can lead to wear and tear.
Taking these simple steps will help extend the life of your door hinges and keep your doors functioning properly.
Tightening loose interior door hinges is a straightforward DIY task that can save you from a lot of frustration. Whether through the toothpick or wood filler method, fixing stripped screw holes doesn’t have to be complicated. You’ll not only improve the functionality of your doors but also enhance the overall look of your home.
So, the next time you hear that annoying creak or see your door sagging, remember: with a little bit of effort and the right tools, you can tackle this issue head-on. Happy fixing!